Frequently Asked Questions
Domain Names
How do I use my existing domain name with the bookalet web builder?
Each domain name provider has their own unique interface, but the general requirement is that you update the DNS records of your domain and add or update your ‘A’ record to point to 209.97.129.155
This is telling the browser that www.[yourdomainname] should point to the bookalet IP address and this is the most basic configuration, you may have many other records for mail (Type MX) and others that you should not update without knowing the implications.
Once this is done, add your domain name to the web builder by selecting the ‘Domain Names’ section on the left hand menu, then click on ‘Add domain’ and enter your domain name.
Please note:
Changing your ‘A’ records won’t make your website appear immediately, it can take up to 48 hours for the changes to propagate around the Internet.
Also, if your domain name has an AAAA (IPv6) record, this must be deleted in order for the SSL certificate to work.
Below are some 'how to' guides from a selection of major domain providers
GoDaddy
Edit an A record
Edit an A record in your GoDaddy zone file if you need to update where your domain is pointing. Changes to an existing A record may cause your website or email service to be temporarily interrupted. If you’re trying to change your www record, you’ll need to edit your CNAME record instead.
- Log in to your GoDaddy Domain Control Center. (Need help logging in? Find your username or password.)
- Select your domain to access the Domain Settings page.
- Select Manage DNS under Additional Settings. You won’t be able to view your records if you see the message We can’t display your DNS information because your nameservers aren’t managed by us. Change your nameservers to manage DNS with GoDaddy.
- Select the pencil icon next to the A record you need to edit.
- Edit the details for your A record:
- Host: The host name the A record links to. Type @ to point directly to your domain name. Or, change a subdomain prefix from store.coolexample.com to shop.coolexample.com.
- Points to: The IP address you are setting as the destination for the host. This is often the IP address of your hosting account.
- TTL: How long the server should cache DNS information. The default setting is 1 hour.
Select Save to complete your changes.
Add an A Record
- Log in to your GoDaddy Domain Control Center. (Need help logging in? Find your username or password.)
- Select your domain to access the Domain Settings page.
- Under Additional Settings, select Manage DNS.
- Select Add under the records table.
- Under Type, select A.
- Enter the details for your A record:
- Host: The host name the A record links to. Type @ to point directly to your domain name.
- Points to: The IP address you are setting as the destination for the host.
- TTL: How long the server should cache information. The default setting is 1 hour.
- Select Save to save your new A record.
Please allow up to 48 hours for your changes to take full effect globally.
IONOS 1&1
Adding an A Record
To add a new A record, follow these steps:
In the Domains section of the Control Panel, next to your desired domain, click on thegear symbol under Actions and selectDNS.
Click Add Record and select the A type.
In the Host Name field, specify the desired host. To create the A record for your domain, enter the @ character. The @ character is used as a placeholder and ensures that the domain is connected with www and all subdomains. If you want to create the A record for a specific subdomain, enter the desired subdomain, such as www.
In the Points to field, enter the desired IPv4 address.
Optional: Select the desired TTL. By default, your changes will become active immediately.
Below the Preview for www row, you can select whether or not you would like to also add this record to the www subdomain.
Click Save.
Editing A Records
You can adjust existing A records in the Control Panel. To do this, simply follow these steps:
In the Domains > DNS section of the Control Panel next to the desired A record, click on the Gear SYMBOL under Actions and select Edit Record.
Specify the desired IP address in the Points To field.
Optional: Select the desired TTL.
By default, your changes will become active immediately.
Click SAVE.
Names.co.uk
Once logged into your Control Panel, click on your domain (if you have more than one), scroll to the bottom of the page and select DNS Settings.
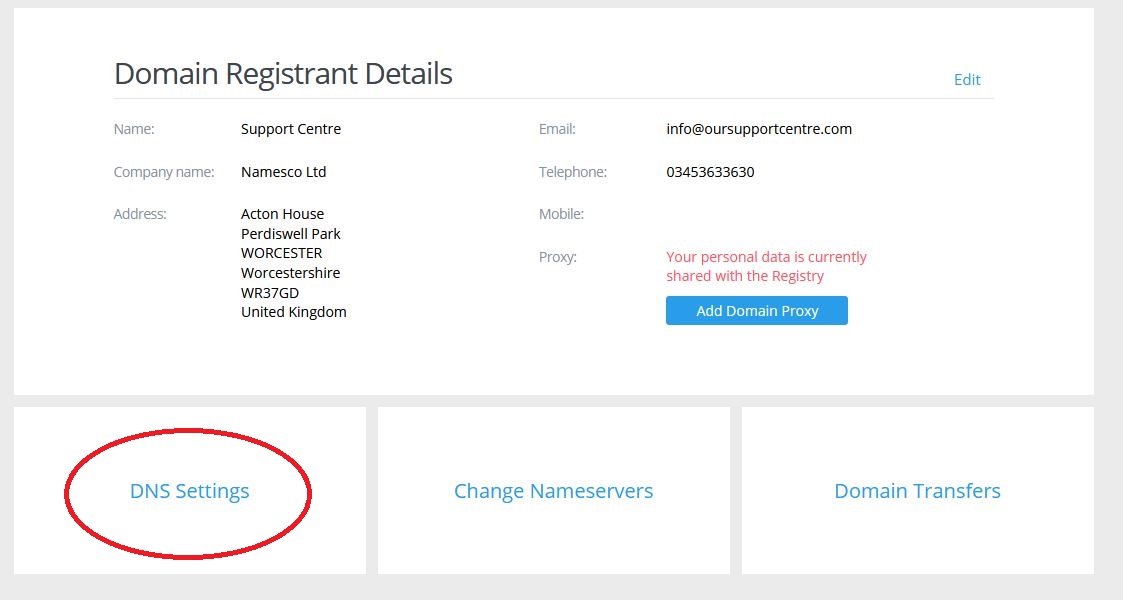
If this is the first time you have ever been to this page, you may see a box appear entitled Activate Advanced DNS, which will require you to tick the confirmation tickbox and click Activate.
Once you have done that once, clicking on DNS Settings will then always take you to the screen shown below.
It is expected that if you are entering in DNS records then you have a degree of familiarity with DNS. If you are at all uncertain about anything then we recommend contacting us for assistance.
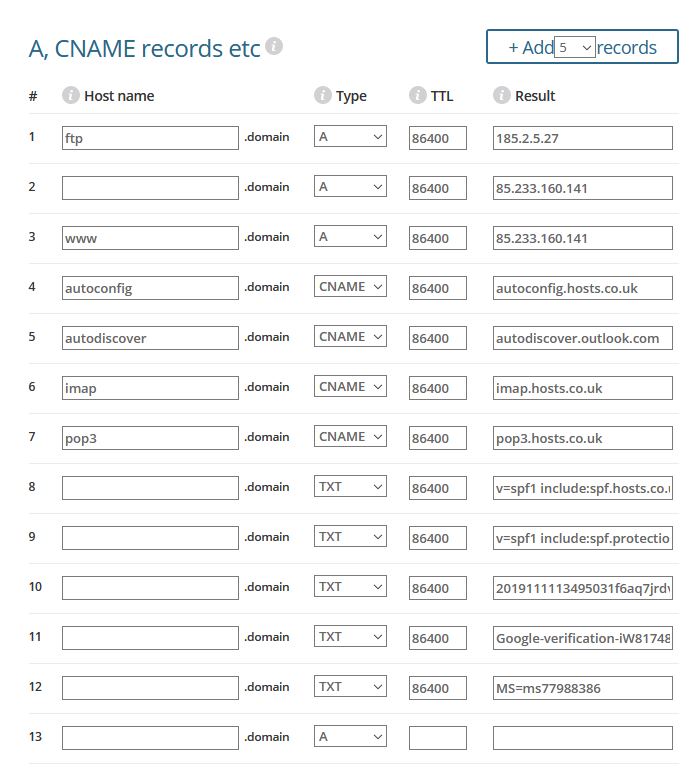
The first section is called “A, CNAME records etc”, and is mainly used for creating or modifying A, CNAME or TXT records.
As an example, if you wanted to create an A record called test.mydomain.com and point it to IP Address 123.123.123.123 then on the first empty row you would enter test into the Hostname box, choose A as the Type, and enter 123.123.123.123 as the Result.
This is shown below.

123 Reg
- Log in to your user account. https://www.123-reg.co.uk/
- Click into the control panel.
- Once in the control panel click into the Domain names section.
- Select the domain name you wish to change the DNS for from the drop down menu. Once one has been selected click the manage button next to it.
- In the advanced domain settings menu, click Manage DNS.
- Click into the advanced DNS tab, this will display all the DNS records associated with the domain name.
- Update the DNS records. You can find the correct IP addresses to use by visiting our support guide here. The below screenshot shows the standard configuration for our UK server.
Once these settings have been saved you have successfully changed the DNS records for your domain. These changes may to 1 – 4 hours to propagate throughout the web.
If you find that you are unable to make these changes yourself or needs further assistance, please contact the support team at 123Reg. They will be able to make these changes for you.
Namecheap
The Host Records section is available only for the domains using Namecheap BasicDNS, FreeDNS or PremiumDNS.
If you have no option to manage the DNS records in the Advanced DNS section, your domain is pointed to a third-party name server OR our hosting servers (dns1.namecheaphosting.com, dns2.namecheaphosting.com). Hence, you need to add/update the DNS records on your current DNS provider or in your cPanel.
To set up host records for your domain in Advanced DNS, use the following instructions:
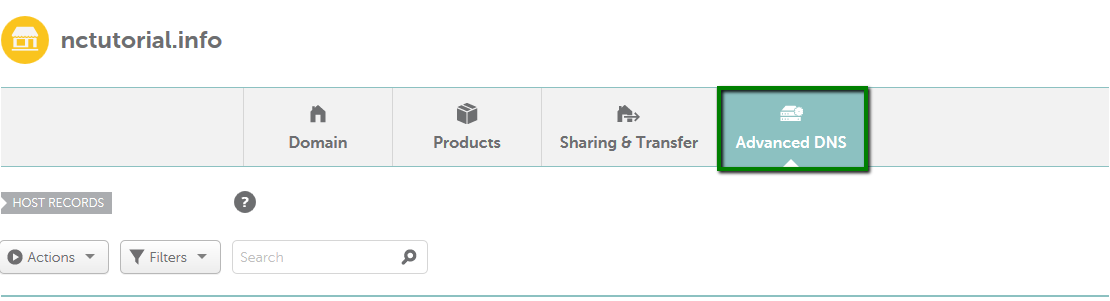
1. Sign into your Namecheap account.
2. Select Domain List from the left sidebar and click Manage next to your domain:
3. Select the Advanced DNS tab at the top of the page:
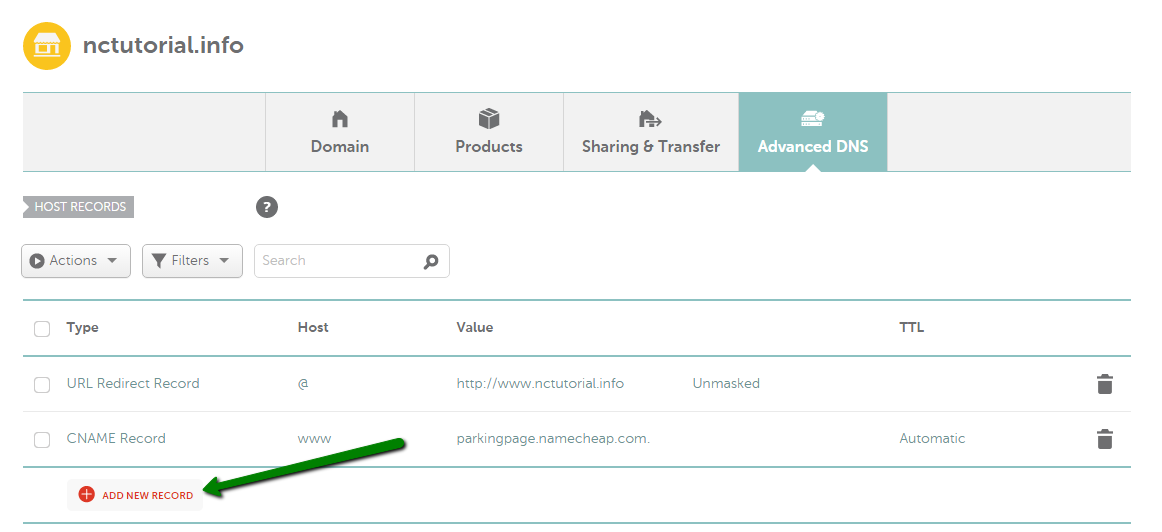
4. In the Host Records section, click the Add New Record button (not able to edit Host Records?):
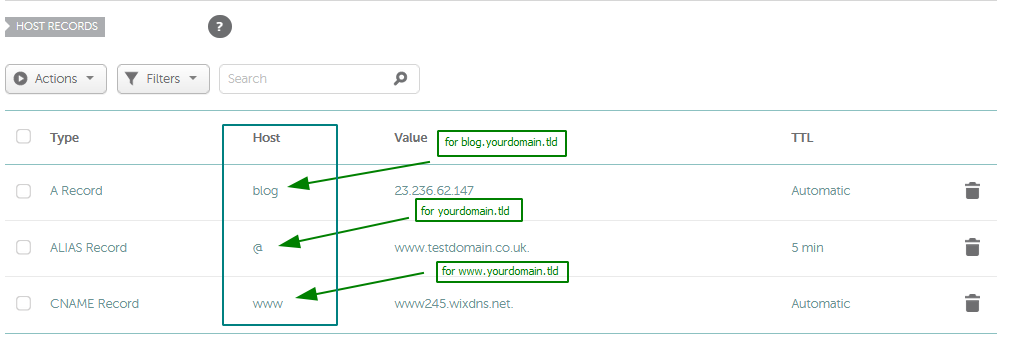
Host: If you need to create a record for a bare domain (e.g., mydomain.tld), it is needed to put @ in this field.
In case a record for any subdomain (like www.mydomain.tld or blog.mydomain.tld) should be created, put only the name of your subdomain into the Host field without mentioning the domain itself. As such, the record for www.mydomain.tld should have only www in the Host:
TTL: A TTL value of 1800 seconds (30 minutes) would mean that, if a DNS record was changed on the nameserver, DNS servers around the world could still be showing the old value from their cache for up to 30 minutes after the change.
Our default TTL is 30 minutes. You can select it from the drop-down or just leave it “Automatic”.